Tuesday, 24 January 2012

Dashu Wujie, Shanghai

There's a new upmarket vegetarian restaurant in Shanghai. Opened in August 2011, Dashu Wujie was created by the founder of Vegetarian Lifestyle chain. It is an upmarket, 5 storey restaurant overlooking over Xujiahui Park, and walking distance from Xujiahui station (line 1 and 9, exit 14.)

The each floor of the restaurant is themed (water, earth, fire, wind, gold) with banquet rooms available for groups. All fruits and vegetables are organic, as is the oil, of which they use minimally as to keep the food as healthy as possible.


The restaurant has incredibly streamlined service, thanks to staff with earpieces and the use of iPads to order your meal. The menu on the iPad is all in Mandarin, however once you click on the image of the food, a description appears in English. Spicy foods are marked with chillis and additionally foods containing onion and garlic are noted. I'm not sure if the menu was vegan, however there would definitely be vegan options.The menu is incredibly extensive and somewhat confusing to navigate if you cannot read Mandarin, for the tabs are all in Mandarin. Despite this, and with help from our lovely waitress we ordered 6 dishes and a pot of tea, all which arrived promptly.

First came our cold starters of eggplant skin filled with silken eggplant cooked with garlic and black vinegar and the visually pretty pickled radish and yam (I think... memory may be failing me!) The eggplant was absolutely delicious and I highly recommend this dish. The pickled radish was great to get the stomach juices flowing for the rest of the meal that followed.


 Next came our mains and bowls of brown rice! Oh how i miss brown rice! We ordered lion's head mushroom in black pepper sauce (as highly recommended by the waitress), mapo tofu (because it's my favourite!), sizzling Korean tofu with kimchi sauce and one other dish that i cannot remember the name! Unfortunately the sashimi was unavailable but the picture looked amazing!
Mapo Tofu... a deliciously saucy version!
The mystery dish
Pouring the kimchi sauce over the sizzling Korean tofu
Lion's head mushroom with black pepper sauce

We all really enjoyed the mushroom in black pepper sauce. The texture was 'meaty' as Dad put it but the flavour was delicious. The mapo tofu wasn't drowning in oil but still had the very spicy kick from the sichuan peppers and chilli. The Korean tofu was nice, but we probably didn't need two tofu dishes. The unnamed dish was awesomely bizarre. There were different crumbed vegetables (mushroom, zucchini, squash, tomato) and what looked like two tuna sticks and a plum and a kewpie tartare sauce. I'm really sorry i can't give a more adequate description but i remember when reading on the menu i didn't understand the English!

The 'tuna' stick. It was delicious!!!
The prices here are not cheap by Chinese standards, however for western standards i'd say it was brilliant. The entire meal cost $53AUD. I only wish i was in Shanghai a bit longer so i could go back!

Just if it couldn't get any cooler - on our way out we got given these pens for Chinese New Year

So cute!

Next time you're in Shanghai i highly recommend visiting this restaurant - even if you aren't vegetarian!

Sarah xx

392 Tianping Lu  天平路392号,近衡山路
3469 2857
open from 11am
Xujiahui Metro Station, exit 14

Monday, 9 January 2012

Dumpling Making Time!

Vegetable Jiaozi at the front, XLB behind.
Shanghai is famous for its dumplings - xiao long bao or pork soup dumplings in English. These little dumplings are filled with pork mince and gelatinised broth so when heated a soup is formed. Now obviously i am not going to try these things so instead i thought i'd try making them as well as some vegetarian dumplings for me :)

My parents, myself and a friend, Mike, scored a private class at Chinese Cooking Workshop, where in 2 hours we would make both xiao long bao and mushroom and cabbage jiaozi.

All the prep was done for us so all we had to do was make the dough, mix the filling and fill. Sounds simple? Well it most definitely wasn't! Our chef was lovely and very patient and helpful and with the assistance of our translator, we made dumplings that roughly resembled XLB.


XLB are round buns with pleated tops. I asked how many pleats we were supposed to make but no one could say. I think chubby western fingers don't make for delicate tiny pleats!


Stupid podgy fingers!
My xiao long bao!
Unfortunately the following day i walked past Shanghai's most famous XLB establishment and saw the lady making dumplings, possibly 10 times faster than me and they were perfect! Put me to shame! It was interesting for me to learn that the gelatinised broth isn't put in the dumpling as one cube as i had thought, it was virtually minced and incorporated in with the pork mince.
.....someone struggled a bit more than others!

Next we made the vegetable jiaozi. These were so much simpler - no pleating of the dough involved! The filling contained diced shiitake, black fungus, cabbage, white pepper, salt, sugar, sesame oil, rice wine, ginger, green onion and light soy. After kneading, rolling, more rolling, squishing and more rolling of the dough, they were ready to be filled. The filling was easy - a spoonful in the centre, bring the sides of the dough together to form a half moon shape and seal using the web between your thumb and first finger.
Jiaozi filling
My Jiaozi!


After cleaning our benches the dumplings were all steamed for 10 minutes and then we sat down to enjoy them with vinegar Shanghai-style. It was amazing, steaming the XLB seemed to hide many of their flaws! They tasted pretty good even though some of them looked seriously dodgy!

Cooked XLB

It was a great class and the best thing i took from it (apart from how talented XLB chefs are) was how to make and roll proper dumpling wrappers.


Off to Yunnan province today. Will be an adventure!

Sarah xx

Sunday, 8 January 2012

Mr & Mrs Bund

Ni Hao from Shanghai!

Since I'm overseas for a little while i thought I'd blog about some of the fabulous places I've eaten at and other food related adventures. Being vegetarian in China isn't always the easiest. They have a plethora of 'vegetable' meals with varied vegetables, tons of tofu and rice/noodles, however, despite saying 'Wo Chi Su' (i am vegetarian - literally i eat vegetables) I've found diced pork, random seafood or oyster sauce in my meals. Anyway, that's all part of travelling and i now know how to say i don't eat meat or fish so hopefully that will help too!There are several dedicated vegetarian restaurants in Shanghai and i hope to visit them soon.

Last night we went to Mr & Mrs Bund which is an upmarket western restaurant by French Chef  Paul Pairet. It's a very cool place. The wait staff wear jeans, suspenders/waist coats and red converse sneakers. The clientele was very western which was amusing after spending so much time being the only white person in a room!

The menu is seriously extensive. The idea is that you create your own meal from different elements. For example, say you want tomato, under the tomato heading there are about 5 different tomato based salads. Same went for other vegetables, meats, fish, rice, desserts etc. There is also a rookie menu if you're too overwhelmed by all the choice. 

The first dish to come out was a complementary starter of tuna mousse and croutons. The plating was so cool in a tuna can and the mousse seemed to have been siphoned, it was that aerated.


Next out came the salads. Is that an American/French thing to have the salads as a separate course? We thought they'd come out as sides to our main course. Anyway we had the tomato mozza salad, which as it seems was cherry tomatoes and buffalo mozzarella with a gorgeous tomato puree. The salad was like eating pure tomato, absolutely delicious!  The second salad was rocket, truffle & Paris mushrooms, soy and parmigiano. It was AMAZING!!!! Just like the tomato salad the flavour was so intense. So earthy and mushroom-y with a hit of saltiness from the parmesan and soy.


Now for the main course. I ordered Risotto Truffle & Paris (yes a little obsessed by truffles/mushrooms) but i don't cook with truffles at home. The bowl was really funky and unfortunately my photo of the risotto itself is hard to see but it was delicious. Perfectly cooked rice with flecks of truffle/mushroom and beautiful flavour.


The folks ordered a hunk of meat to share. It was enormous! It looked like something from the Flintstones. We also ordered steamed greens to go with the mains.


Now for the desserts. Mum and I both ordered Lemon & Lemon Tart as I'd seen a picture of it and i was not disappointed. This is a candied whole lemon, filled with lemon sorbet, lemon curd, chantilly and pink citrus (grapefruit?)

Dad ordered Strawberry and Coca-Cola sorbet. Bit odd? But he loved it!


It was a fabulous evening and the wait staff were lovely. At the end of our meal they brought over an iPad with their wares for sale (cutlery, glasses etc and also takeaway food items) different idea, but effective!

Until next time

Sarah xx

Mr & Mrs Bund

Bund 18, 6/F
18 Zhongshan Dong Yi Lu (near Nanjing Dong Lu)
Shanghai 200002
China
http://www.mmbund.com

Sunday, 1 January 2012

New Years Eve Nibbles

Happy New Year!!! I hope the year brings happiness, health and excitement to you all!

Sundried Tomato Dip (left), Chunky Basil Dip (right), Za'atar Labneh (front)
Last night my friends and I gathered at a friend's for NYE. Considering the heat i decided to make a platter of nibbles to go with our drinks.

The sundried tomato dip is from EDC and it's super easy to make. Just place 1 clove of garlic, 160g unsalted cashews, 1 small deli tub of semi-sundried tomatoes, 2 tbsp grated parmesan, 1 red capsicum (chopped), 40ml olive oil and 40ml vinegar into a food processor or Thermomix and pulse 3-4 times until roughly chopped. It is so quick yet so delicious!

For the chunky basil dip i placed 80g pinenuts, 80g unsalted cashew nuts, 100g basil leaves (a big bunch), 1 clove garlic, 1/3 cup grated parmesan cheese, 40ml vinegar and 40g olive oil into the Thermomix and turbo-ed (pulsed) 3 times. You may need to add an extra tablespoon or two of olive oil however i didn't need it. Adding extra olive oil will also help the basil leaves to stay a vibrant green and not discolour so quickly.

Speaking of which i get so annoyed when i make pesto and it goes brown. I've tried putting a layer of oil on top and completely covering the surface with cling film but nothing seems to work! It's so frustrating! Over on the Taste forums it was suggested that pesto could be frozen so i've given it a shot. I placed some in a small ziplock bag to use tomorrow. Hopefully it will be as good as fresh. It looks like it's gone a bit of a duller green but it's definitely not brown.

Any other ideas how i can keep pesto a nice colour?  Or other suggestions on what i can do with basil? My basil plants have gone crazy this year!

Sarah xx

Saturday, 31 December 2011

Yoghurt & Labneh

One of the very first things i tried in my Thermomix was yoghurt and unfortunately i called it a Thermie Fail. Perhaps i was mistaken as i think thermos fail was probably a more appropriate title. For Christmas i was lucky enough to receive a yoghurt making kit from Cheeselinks

So all set with my machine (which basically is an electric thermos that keeps the temperature at 37 degrees) my starter culture and my milk, i was ready to begin!

It is so simple! All you have to do is mix 1L milk (UHT is easiest because you don't need to sterilise it first) with 100g skim milk powder and 1/10th teaspoon yoghurt culture. Pop it in the machine and 12 hours later you have delicious yoghurt!

After the yoghurt has thickened you need to put it in the fridge however before doing this i mixed in 1 tbsp vanilla extract and 2 tbsp agave to sweeten. You can make your yoghurt any flavour you wish - just add in the flavour/fruit puree/jam after it has thickened.  

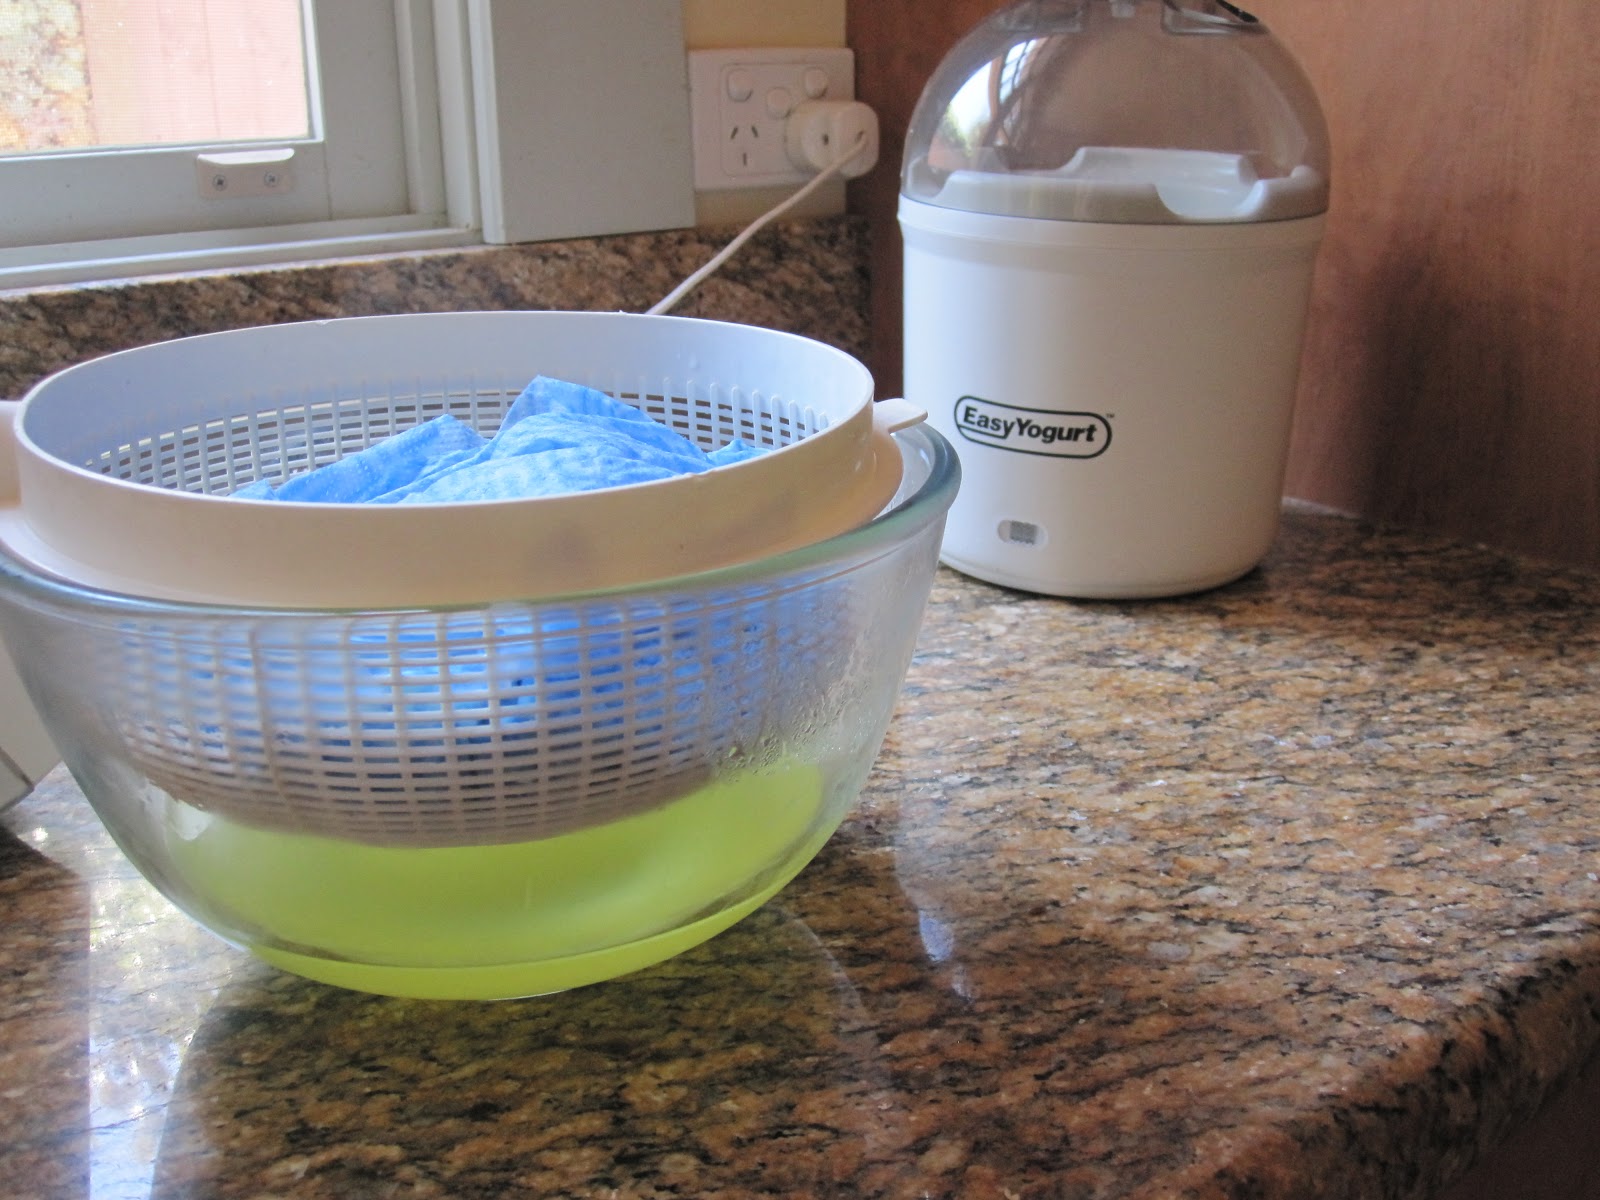
Because i like my yoghurt thick, i used the extra milk powder, however you don't have to. I also used skim milk which worked fine. Another thing you can do if you like your yoghurt really thick is to drain some of the whey off but putting it in a clean chux or muslin.


Apart from being a bit chuffed that i'd made my own yoghurt (and hadn't given myself food poisoning in the process) i was also amazed by the cost. This yoghurt cost less than $2/kg which a massive saving when you think that supermarket yoghurt costs upwards of $6/kg.

So after my initial yoghurt success i set out to make some labneh or yoghurt cheese. It is so simple! All you need is 1kg yoghurt, 1tsp salt and a chux. If you don't have homemade yoghurt just buy any type of thick unflavoured greek yoghurt. For my yoghurt i used 1L full cream UHT milk and 100g skim milk powder plus the culture. 

All you have to do is get your chux, a colander and a bowl and immerse in boiling water to sterilise. Then, pop the colander over the bowl and line with the wrung out chux. Mix the salt into your yoghurt and pour into the chux then tie with a rubber band then pop it into the fridge. I left mine for 24 hours however i think 12 hours would be enough as i noticed that the majority of the whey drained in the first 12 hours.  


Once you think you yoghurt can drain no more, remove it from the chux. With any luck it should look like this.....


 Now the fun bit starts - rolling labneh balls! OK well it wasn't as easy as i expected as the yoghurt kept sticking to the spoons. I used 2 teaspoons and sort of quenelled the labneh. Luckily once you roll them in whatever coating you choose they end up as perfect balls! So i wouldn't worry too much about getting them pretty initially.
Dodgy uncoated labneh

I used za'atar to coat the balls. Za'atar is a middle eastern spice mix made from sesame seeds, sumac, thyme and salt. You can use any spice mix or fresh herbs to coat the balls. It really is up to you. Otherwise you can leave them uncoated and store them in an oil-filled jar.

They magically became round!

 Labneh can be eaten as part of a mezze, spread on bread or on biscuits. It can also be added into salads or eaten straight! Labneh doesn't always have to be savoury either. It tastes similar to cream cheese so can be used in sweet dishes (perhaps omit the salt!) Either way i'm really pleased how these turned out. Although it takes a bit of time to let it drain etc, it really is very easy and cheap to do!

I love my new toy and i'm sure it will be used very frequently from now on. I'm hoping to experiment with some dairy-free milk yoghurts in the future and see what happens!

Sarah xx


Friday, 30 December 2011

GF Banana & Walnut Cake

Today i craved to bake. Not too unusual for me but the family definitely doesn't approve of baking when the weather warms up! I felt like banana bread but had no manky bananas so went on a bit of a hunt nearby and ended up getting old bananas for 80c/kg! Bargain! I now have a zip lock bag full of chopped up bananas in the freezer for later use. I was tempted by a tray of mangos (12) for $10 but resisted.

I turned to my failsafe GF cookbook - Gluten-Free Baking Classics by Annalise Roberts for a banana bread recipe, only to find there wasn't one, however there was a recipe for banana nut muffins so i baked that in loaf-form instead.

Check out her blog http://mygluten-freetable.com/ for more gluten free inspiration!

You can find the recipe here

Sarah xx

Wednesday, 28 December 2011

Christmas Wrap Up

Hello!

I hope you all had a fabulously festive Christmas! I apologise for the lack of blog posts recently, Christmas craziness got the better of me!

The Thermomix hasn't gone to the back of the cupboard - in fact it's been used almost every day. Over the past week or so i have made:

-CADA (EDC)
-Lychee sorbet
-Roast peach sorbet
-Raspberry sorbet
-Vanilla icecream
-Tropical sorbet
-a million different smoothies
-Basil pesto (EDC)
-GF crepes

And today - the easiest béchamel sauce (EDC) ever!!! 1L milk, 100g butter, 100g flour, nutmeg all thrown in, 90C and 12 mins later added 1/2 cup parmesan cheese and voila! Lump-free, thick and delicious béchamel! Very happy! I have to admit, béchamel has never been my forte. I used to resort to using the stick blender to get out the lumps!

My béchamel was for a lasagne that i made for my cousin.
Dodgy, rushed iPhone pic!

This is not a vegetarian recipe. I have adapted a Guy Grossi recipe that was in the newspaper a few years back. This is what i do when i don't use a Thermomix. The Bolognese sauce quantity makes enough for the lasagne plus a couple of extra tubs of sauce.

Béchamel

1L milk
1 small onion
1 bay leaf
1 clove
80g butter
80g flour
½ cup grated parmesan
Salt and pepper
Nutmeg


Bolognese 

50ml olive oil
1 large onion, chopped
2 cloves garlic, chopped
500g minced beef
500g minced pork & veal
2 tbsp fresh sage, chopped
1 tbsp dried oregano
4 bay leaves
2 cloves, crushed
Grating of nutmeg
Salt and pepper
200g tomato paste
200ml red wine
2 x 800g tins diced tomato


OtherLasagne Sheets
1 cup grated mozzarella or tasty cheese

Béchamel Sauce
Warm milk, onion, bay leaf and clove in saucepan until simmering. Rest for 15min off the heat, then strain.

Melt butter in saucepan , add flour, stir with wooden spoon to a smooth paste. Cook stirring continuously, for 2-3min, without colouring.

Stir in milk gradually, ensuring no lumps form and bring to the boil beating vigorously. Add salt, pepper and nutmeg and slow simmer for 10min. Take off the heat and stir through parmesan.


Bolognese

Heat oil in a large pot. Sauté onion and garlic over medium heat until soft. Add the meats and sauté until well browned.

Add herbs, spices, salt and pepper and tomato paste and cook for 1-2min, then add the wine and boil to reduce by half. Add tomatoes and bring to the boil, reduce heat and simmer for 3-4 hours (you may need to keep an eye on the liquid level, add water if required.)


To assemble

Personally i make my own pasta sheets, and for this lasagne i use 2 eggs, 1 tbsp olive oil and 200g 00 flour. You can use pre-made sheets if you wish :)

Spread 2 ladlefuls of bolognese sauce on the bottom of a baking dish and cover with lasagne sheets. Top with approximately 4 ladlefuls of bolognese and half the bechamel. Cover with lasagne sheets. Spread another 4 ladlefuls of bolognese and top with lasagne sheets. Pour over the remaining béchamel and top with grated cheese. Cook at 180C for 30-45mins or until golden.

Note. If freezing lasagne it is easier to refrigerate overnight then cut.

I'm not sure how much i'll be able to post over the upcoming month... holiday time!

Until next time,


Sarah xx

Sunday, 18 December 2011

Turkish Torte

Today was one side of my family's Christmas party and i was in charge of supplying a dessert. As soon as i saw the picture for the Turkish Torte in the Dec/Jan edition of Delicious Magazine i knew i had to make it. I love the colours of the pistachio, pomegranate, mint and rose petals sprinkled over the oozing chocolate glaze. It was a very easy recipe to make - whip egg whites, add sugar and fold in almond meal, dates, orange zest, chocolate halva and choc bits. Cook, drown in brandy and cover in choc glaze. Simple, really!

Sarah xx

P.S. i'm not sure if i'm allowed to post up the recipe due to copyright issues. As it is one by Valli Little i assume it will come on Taste.com.au in the near future. As soon as it does i'll paste the link!
EDIT: Here is the link http://www.taste.com.au/recipes/28622/turkish+torte

Sunday, 11 December 2011

Masterchef Risotto

I love beetroot. I think it has overtaken eggplant as my favourite vegetable. Beetroot salad, dip, relish and RISOTTO! This recipe is only for beetroot lovers so steer clear if you're a fence sitter!

Beetroot Risotto (adapted from this one)
serves 4

3 large beetroot, roasted then diced (or use tinned but it wont taste as good!)
1 onion, quartered
2 cloves garlic
40g olive oil
250g arborio rice
1 tbsp chopped fresh thyme
100ml red wine
600ml vegetable stock
400ml beetroot juice (or extra stock)
100g walnuts, roasted
125g goat's cheese
rocket leaves
balsamic glaze

Put onion and garlic in Thermomix and chop on speed 6 for 5 seconds. Add oil and cook for 2 minutes at 100 degrees on speed 2. Add rice and thyme and cook for 2 minutes at 100 degrees on reverse + speed 2. Add wine and cook for 1 minute at 100 degrees on reverse + speed 2. Add stock and juice and cook for 15 minutes at 100 degrees on reverse + speed 2 or until most of the liquid has absorbed. Add beetroot and some ground pepper and leave to sit for 5 minutes.

Serve into dishes and sprinkle with walnuts and goat's cheese. Serve with dressed rocket.

Sarah xx

Thursday, 8 December 2011

Dips

Sorry for the lack of posting recently - work has gotten hectic and i barely have time to eat let alone cook! Hopefully things will calm down soon and i can spend some quality time in the kitchen!

I love dips. On a hot night i'd much prefer to eat dips with vegie sticks than a proper meal.

These are my 2 of my favourite dips and they are so quick and easy to make. Normally i'm all for making something with the longest ingredients list, method and time spent in the kitchen but these are an exception.

Eggplant dip is everywhere and i have made many, many versions but this is my favourite and it's also the easiest with only 2 ingredients plus salt & pepper. I don't like mayo but this dip doesn't taste of mayo and it makes it delicious!

Eggplant Dip

2 Eggplants
2 tbsp good quality mayonnaise
salt & pepper

Barbecue the eggplants until the skin is blackened and the eggplant is floppy. Leave to cool. When cool remove skin and blend with mayonnaise (10 seconds speed 4). Add salt and pepper to taste.

This dip is also tasty and very, very moorish. It has a secret ingredient - pomegranate molasses. If you've never tried it you should! It is a tangy syrup and is available from delis and middle eastern stores. It makes awesome salad dressings too!

Roast Capsicum and Walnut Dip

3 red capsicums
75g roasted walnuts (you can have raw but they taste better roasted!)
1 clove garlic, crushed (optional - i'm not the biggest fan of raw garlic)
1 tbsp pomegranate molasses
1 tbsp lemon juice
2 tsp ground cumin
salt and pepper

Barbecue the capsicums until the skins are completely black (alternatively bake in the oven or hold over a flame.) Leave to cool. When cool, remove the blackened skin and place in a Thermomix/food processor/blender along with all other ingredients. Turbo 3 times. Enjoy!

Sarah xx

Sunday, 4 December 2011

Butterfly Cake

Flourless orange and almond cake
This is my latest creation. It was originally going to be a two tiered cake but sometimes things change and this was the result. I'm still really happy with it. I think it'd make a lovely wedding cake!

The cake is Planet Cake's orange and almond cake which I adapted so I could make it in the Thermomix. It then has a layer of buttercream then fondant. The butterflies are fondant + tylose and with white edible shimmer powder.

It really is a beautiful cake and makes a nice change from a mud cake. Still gives you the same sugar coma after eating!

Sarah xx

Saturday, 3 December 2011

Chocolate Salami

Need an edible gift idea for Christmas? Well this might just be it!

Chocolate salami was originally a portuguese dessert. It is basically a soft chocolate filled with biscuits, nuts and fruit or whatever you desire! It is similar to a fridge cake or even hedgehog. There are many recipes for the chocolate, some are a ganache, others use condensed milk, some use cocoa, some real chocolate i think you can use whatever you have on hand. Traditionally chocolate, yolks, butter, sugar and port are used.

The recipe i found is from The British Larder and it has both a Thermomix and a normal method. The original recipe can be found here.

I amended my version slightly - i used shortbread biscuits, pistachios, macadamia nuts and dried cranberries in the filling. It also took me 3 minutes to melt the butter and 2 minutes to melt the chocolate.

Here is what i did

Chocolate Salami - adapted from The British Larder

Makes 2 logs


80g unsalted butter
200g dark chocolate
100g icing sugar
200g shortbread biscuits
80g macadamia nuts, chopped
80g dried cranberries
80g pistachios
2 egg yolks
80g Port Wine (or other liqueur)
1tsp vanilla extract
80g condensed milk
Pinch of salt

Coating
¼ cup cocoa powder
½ cup icing sugar

Break biscuits into small chunks and place in a bowl. Add nuts and cranberries and stir to combine. Add 40g port. 

In the Thermomix add butter and melt for 3 minutes at 50 degrees on speed 2. Add chocolate and melt for 2 minutes at 50 degrees on speed 2. Add yolks, sugar, condensed milk, salt, port and vanilla and cook for 6 minutes at 50 degrees on speed 2.  Pour over biscuit mixture and stir to combine. Let mixture rest for 20 minutes before shaping into two logs on clingfilm. Roll up clingfilm and tie up both ends to seal before placing in the fridge. When the logs are almost set roll log in a sushi mat to achieve the ridges, put back in fridge to set solid. 

Combine cocoa powder and icing sugar. Coat salami in icing mixture then wrap in clingfilm or paper  and store in the fridge. 

Enjoy!

Sarah xx

Willim, Malvern

Wandering around Malvern this morning we came across this little cafe just off Glenferrie Rd. I had heard it mentioned somewhere before and it was packed full of people so we thought we'd give it a shot. Willim uses only the finest produce - 5 senses coffee, green eggs and le Madre sourdough. The cafe is tiny and was fairly crowded yet it wasn't noisy.

They serve breakfast until 3pm which is a big tick in my book - i mean who doesn't want to have breakfast for lunch?!. The menu is smallish with only 8 offerings for breakfast however all looked amazing. I was tossing up between the smashed avocado, persian fetta, toasted grain sourdough, slow poached egg (62.5degrees) $10.50 or the brioche french toast, poached rhubarb, hazelnut streusel, yoghurt, smoked maple syrup $13.50 however i settled on the savoury. It was delicious! The egg (and there was only 1) was perfectly poached and the avocado/fetta smash was creamy, salty and packed full of flavour.

Unfortunately i was slack hungry and started eating before i remembered to take a photo. Apologies!

The coffee was perfect and the service friendly and efficient. They also do sandwiches and salads and have a cabinet full of baked goodies.

I would definitely recommend Willim for breakfast or even just a coffee on the go. Check out their website for more info and pictures http://www.willim.com.au/Home.html

Sarah xx

Friday, 2 December 2011

Oaty Fruit Squares

This is not a Thermomix recipe. I suppose you could do bits of it in the Thermomix but it's so simple so it's probably not even worth it.

This recipe is my favourite recipe that Grandma used to make. It's basically a crumble slice and uses general pantry ingredients. It is hard to cut, very unphotogenic but tastes delicious!

Give it a shot!

Sarah xx

P.S. it is easily veganised - sub Nuttlex for the butter.
Ok so it looks really ugly - but believe me it's delicious!


Oaty Fruit Squares

1 cup raisins, chopped
1 cup apricots, chopped
2/3 cup water
1 cup chopped pecan nuts
2 tsp grated lemon rind
2 tsp lemon juice
1¼ cup plain flour
½ tsp salt
1½ cup cooking oats
¾ cup brown sugar
170g butter

Preheat oven to 180 degrees. Combine fruits and water in a saucepan and simmer until water is absorbed (5 minutes.) Stir in nuts, peel and juice. Combine dry ingredients. Melt butter and put into flour mixture. Stir until crumbly. Remove 1 cupful for topping. Press remaining mixture into a lamington tin. Spread on fruit mixture then top with crumbs.
Bake for 25 minutes.  

Thursday, 1 December 2011

Turkish Delight

I was set a challenge by a friend, who wishes to remain anonymous but let's just say he enjoys travelling ;) He wanted to see if turkish delight could be easily made in a Thermomix and i'm pleased to report it can! Now i know turkish delight is one of those things that divides people so if you don't like the rosewater flavour you could easily flavour it with other things such as lemon, vanilla, orange, peppermint etc etc. The great thing about turkish delight is that it sets as a gel - without gelatine! If you don't like eating it straight consider putting it in rocky road, icecream, slices... the list goes on. I'll try and make a few things with turkish delight in the upcoming weeks.


Although I gave it a test in the Thermomix which made the whole process very easy you could definitely do it in a saucepan. I halved the recipe as i wasn't sure if it'd work and i didn't want to make a huge quantity but it really is up to you. 

Here's what i did (this is the full recipe)

Turkish delight (makes about 40 large pieces)

950mL water
900g sugar
225g cornstarch (cornflour made from corn)
20mL rosewater (or whatever flavour you like)
10mL lemon juice
6.5g cream of tartar
red or pink food colour 

To coat
60g cornstarch
225g pure icing sugar.

In a heavy based saucepan place 250ml water, sugar and lemon juice and heat until the mix reaches soft ball stage (about 115*C). Do not stir. 

While this is happening place butterfly attachment into Thermomix bowl and add cornstarch and cream of tartar. Set time to 5 mins, temperature varoma, speed 2 and gradually add in remaining water ensuring no lumps are formed. At the end of this time it should be boiling and a thick paste should have formed (looks like clag!)

Set time to 60 mins, temperature 80, speed 2 and slowly pour in sugar syrup. In the meantime line a 20cm square tin with clingwrap. When the time is almost up (1 minute left) add rosewater and a drop of food colouring.

Quickly pour mixture into tin and smooth as fast as possible. It will set quite quickly. Allow to cool to room temperature then cover with cling film and leave to cool overnight.

Mix together coating ingredients.  Unwrap turkish delight and cut into squares. I found my knife cut through it easily with no sticking but if it starts to stick you can oil your knife. Toss pieces in coating mixture and enjoy! If you don't plan on eating straightaway i would advise not coating the pieces in the icing mixture as mine melted into the turkish delight after awhile. Just coat before serving :)


Sarah xx

Wednesday, 30 November 2011

It's a Cakewich!

Peanut Butter and Jam Cakewich!
For my birthday this year my brother bought me an awesome novelty cake tin - a sandwich! It is a silicone tin made by Fred & Friends - a very cool but quirky company. You might know them as the maker of babushka measuring cups. You can find them here.


Anyway the time had come to road test this cool looking pan. On the back of the box was a pound cake recipe and a recipe for peanut butter buttercream.The recipe for the pound cake is posted on many blogs - you can find it here or just google it! I winged the buttercream recipe to suit my taste. I used 125g butter, 1/2 cup peanut butter and about 1/2 cup icing sugar all creamed up in my Kitchenaid mixer (a Thermomix would work too, or a strong arm!) 


To assemble it's easy - just cut a thin layer off the top of the cake so it looks like a slice, slice through the centre then fill with buttercream and jam. Yum!


Overall it was a huge success. My friends and I wolfed it down. I'd never had peanut butter and jam before but it was a great cake filling. I'm not sure about on toast - i'm yet to try it! The pound cake was moist and moorish. I think i'll use that recipe again in the future.


Big cake decorating job ahead on the weekend... stay tuned ;)


Sarah xx

Tuesday, 29 November 2011

Bluecorn St Kilda

It was one of those dinners that has been on the cards for months, yet we could never find a night to suit us all. Finally we secured a date and headed off to Bluecorn in St Kilda. After reading several recent poor reviews i was a little concerned as i had had some brilliant meals there in the past. We managed to get in at 7.30pm on a Monday night with no booking which was fabulous!

The 3 of us ordered drinks and had 1 entree and 2 mains between us. We chose:

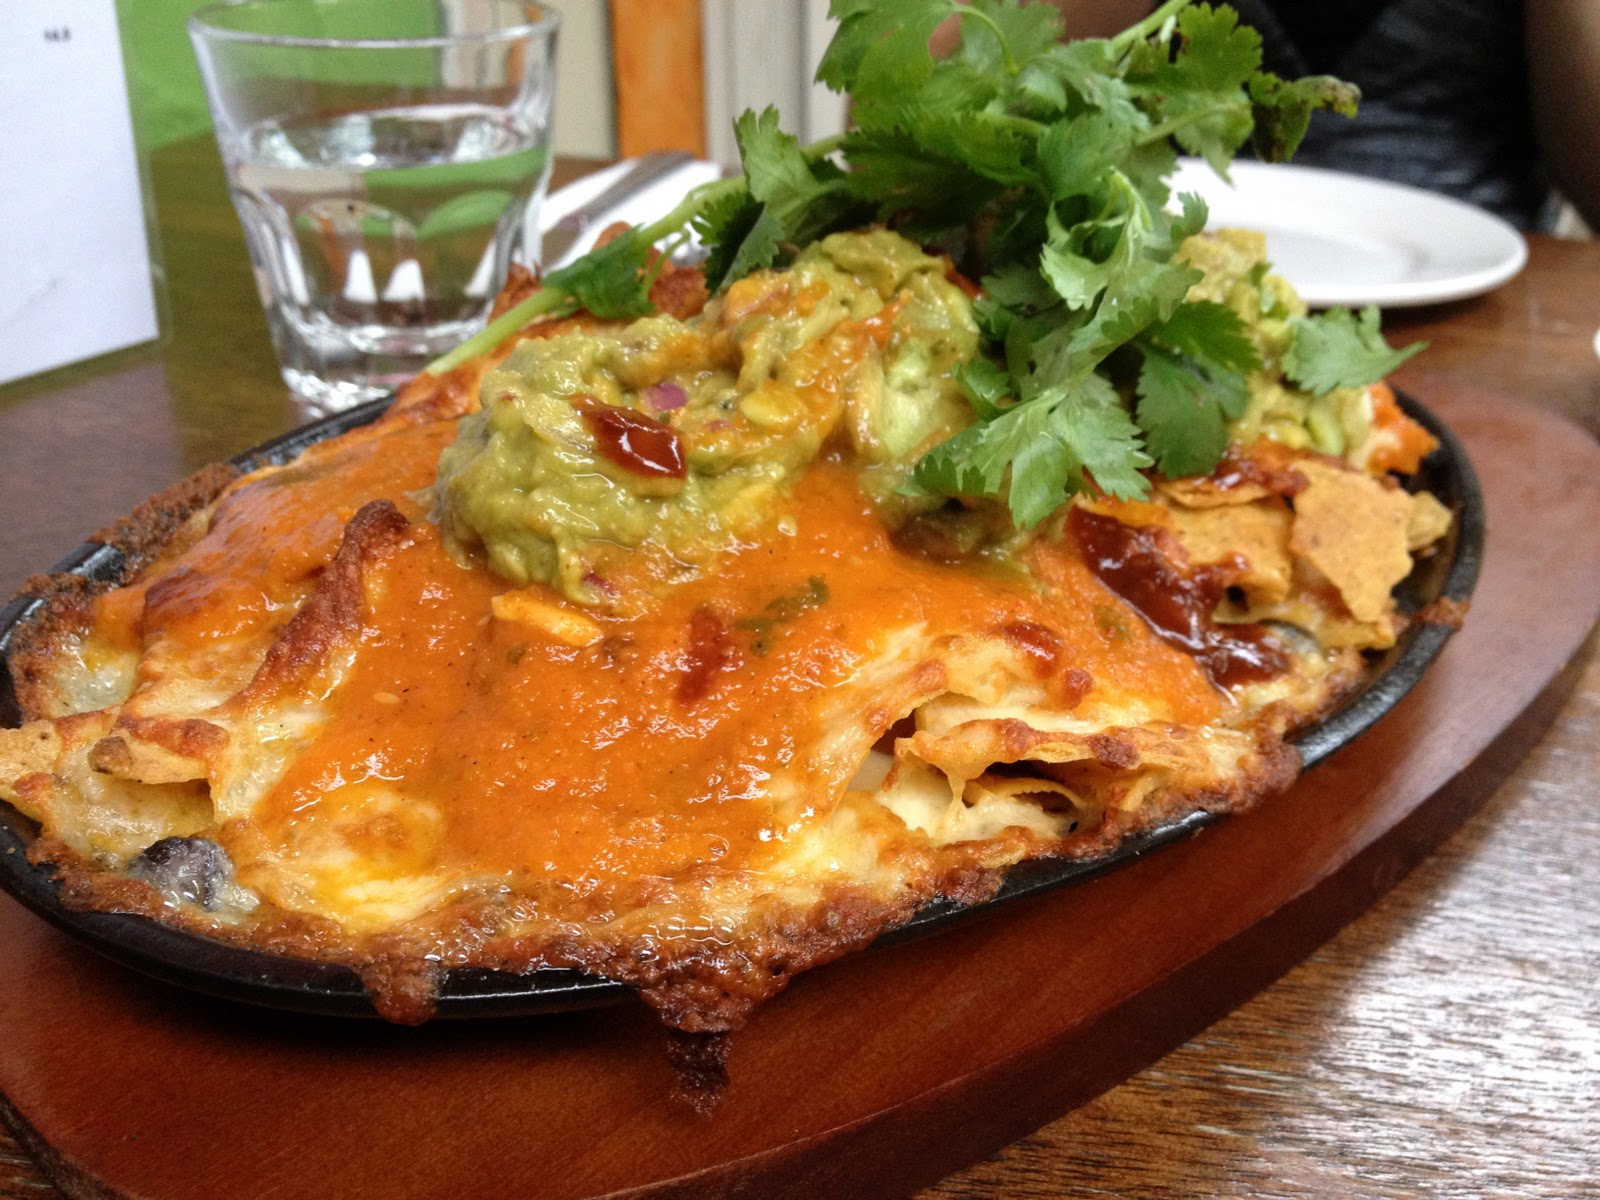
Nachos with cheese, black beans, guacamole and an awesome salsa
Despite the cheesiness on top, the nachos weren't bombarded in cheese Taco-Bill style and were very crispy and tasted quite fresh. Underneath was a layer of black beans which made the dish feel slightly healthy. The red salsa was delicious - i want the recipe!

Vegetarian Burrito
This was my favourite. An awesome burrito filled with corn, beans and potato, again with the awesome salsa and guacamole.

Blue corn goat's cheese quesadilla
This dish was also delicious and the blue corn tortillas were so pretty! It was quite strong in goat's cheese which i love but others may find it overwhelming. The sauces were fabulous again! I think this was a cashew crema but i'm not 100% sure...

All in all our meal was fabulous! Thankfully i remembered the excessive size of their dishes so we only ordered 2 mains which was more than enough. Given the price ($$$ for mexican), i think they would do better to cut the size and the price. Having said that for us food + drinks was $30pp which isn't too bad. I had the mocktail (lime & mint) which was beautiful.  Also the waitress we had was very attentive and helpful and wasn't at all impatient with our indecisiveness! 

It was a fabulous night and i'm so pleased that we had a fabulous Bluecorn experience. Maybe they have turned a corner and are back to their previously excellent standard.

Sarah xx

Saturday, 26 November 2011

Chocolate Almond Slice

I managed to find another reason to bake - that pesky jar of homemade nutella! It is so incredibly moorish that i needed to get rid of it before i ate it all! So i decided to share the love and bake a slice using nutella which i'll take into work tomorrow for everyone. I found this recipe on Taste which sounded good so i thought i'd give it a shot - without a Thermomix in sight! You see, i have to give the Kitchenaid mixer a turn sometimes!

The slice was very easy to make. The crust (which is more like a pastry) was hard to press into a tin so i rolled it out first then lined the tin but apart from that it was simple. I used vanilla extract, not almond essence which contributed to it being a very dainty slice. It is not sweet - it would be quite bland without the nutella to be honest, but altogether it makes for a slice that i think my work friends will enjoy.

Sarah xx