Wednesday 30 November 2011

It's a Cakewich!

Peanut Butter and Jam Cakewich!
For my birthday this year my brother bought me an awesome novelty cake tin - a sandwich! It is a silicone tin made by Fred & Friends - a very cool but quirky company. You might know them as the maker of babushka measuring cups. You can find them here.


Anyway the time had come to road test this cool looking pan. On the back of the box was a pound cake recipe and a recipe for peanut butter buttercream.The recipe for the pound cake is posted on many blogs - you can find it here or just google it! I winged the buttercream recipe to suit my taste. I used 125g butter, 1/2 cup peanut butter and about 1/2 cup icing sugar all creamed up in my Kitchenaid mixer (a Thermomix would work too, or a strong arm!) 


To assemble it's easy - just cut a thin layer off the top of the cake so it looks like a slice, slice through the centre then fill with buttercream and jam. Yum!


Overall it was a huge success. My friends and I wolfed it down. I'd never had peanut butter and jam before but it was a great cake filling. I'm not sure about on toast - i'm yet to try it! The pound cake was moist and moorish. I think i'll use that recipe again in the future.


Big cake decorating job ahead on the weekend... stay tuned ;)


Sarah xx

Tuesday 29 November 2011

Bluecorn St Kilda

It was one of those dinners that has been on the cards for months, yet we could never find a night to suit us all. Finally we secured a date and headed off to Bluecorn in St Kilda. After reading several recent poor reviews i was a little concerned as i had had some brilliant meals there in the past. We managed to get in at 7.30pm on a Monday night with no booking which was fabulous!

The 3 of us ordered drinks and had 1 entree and 2 mains between us. We chose:

Nachos with cheese, black beans, guacamole and an awesome salsa
Despite the cheesiness on top, the nachos weren't bombarded in cheese Taco-Bill style and were very crispy and tasted quite fresh. Underneath was a layer of black beans which made the dish feel slightly healthy. The red salsa was delicious - i want the recipe!

Vegetarian Burrito
This was my favourite. An awesome burrito filled with corn, beans and potato, again with the awesome salsa and guacamole.

Blue corn goat's cheese quesadilla
This dish was also delicious and the blue corn tortillas were so pretty! It was quite strong in goat's cheese which i love but others may find it overwhelming. The sauces were fabulous again! I think this was a cashew crema but i'm not 100% sure...

All in all our meal was fabulous! Thankfully i remembered the excessive size of their dishes so we only ordered 2 mains which was more than enough. Given the price ($$$ for mexican), i think they would do better to cut the size and the price. Having said that for us food + drinks was $30pp which isn't too bad. I had the mocktail (lime & mint) which was beautiful.  Also the waitress we had was very attentive and helpful and wasn't at all impatient with our indecisiveness! 

It was a fabulous night and i'm so pleased that we had a fabulous Bluecorn experience. Maybe they have turned a corner and are back to their previously excellent standard.

Sarah xx

Saturday 26 November 2011

Chocolate Almond Slice

I managed to find another reason to bake - that pesky jar of homemade nutella! It is so incredibly moorish that i needed to get rid of it before i ate it all! So i decided to share the love and bake a slice using nutella which i'll take into work tomorrow for everyone. I found this recipe on Taste which sounded good so i thought i'd give it a shot - without a Thermomix in sight! You see, i have to give the Kitchenaid mixer a turn sometimes!

The slice was very easy to make. The crust (which is more like a pastry) was hard to press into a tin so i rolled it out first then lined the tin but apart from that it was simple. I used vanilla extract, not almond essence which contributed to it being a very dainty slice. It is not sweet - it would be quite bland without the nutella to be honest, but altogether it makes for a slice that i think my work friends will enjoy.

Sarah xx

Peanut Butter Choc Chip Cookies

The time had come to bake. The house still reeked of onions and i thought the smell of cookies baking would be the only solution to eliminate the pong. With no butter in the house, options were limited so i went back to an old favourite - peanut butter choc chip cookies. Unless you have been living under a rock you are probably fairly aware of this recipe as it is widely published on the internet. I first saw it on Taste -Peanut butter & choc chip cookies. The great thing about this recipe is that it is gluten free, yet tastes 'normal' and it only has 5 ingredients - peanut butter, brown sugar, bicarb soda, egg and choc chips. You can also make it just with a bowl and spoon! No fancy appliances required!

The result is chewy, moorish cookies perfectly flavoured. The hardest bit? Not eating them all at once!

Sarah xx

Friday 25 November 2011

Homemade Nutella

Homemade Nutella

I made what!?!? Yup it's nutella!!!! A bit of an adults version as i made it with 55% cocoa dark chocolate so it isn't sickly sweet, it is quite rich though! You could probably add some sugar or use 50/50 milk to dark or all milk chocolate if you wanted it to be a tad sweeter.

It was really easy to make... just roast, blend, melt, blend!

You don't need a Thermomix to make this - a decent food processor/blender will suffice!


Homemade Nutella


200g hazelnuts, roasted and skins peeled off
100ml milk
25g skim milk powder
150g dark chocolate

Place the hazelnuts in the TMX bowl and turbo until crumbs form (you will need to keep scraping down the side of the bowl.) Blend at speed 6 for 2 minutes, scraping down the bowl at least once. Hopefully your hazelnuts will miraculously liquify!


Remove the liquid hazelnuts from the TMX bowl. 

In the TMX bowl add milk, milk powder and chocolate (don't worry about cleaning the bowl.) Heat for 2 minutes at 50 degrees on speed 3 until chocolate is melted and well incorporated. Add hazelnut mixture and blend on speed 6 for 1 minute, scraping down as necessary, until you have nutella!

This is the way i did it - i made it up as i went along. You may be able to just add the chocolate and milk to the hazelnut mixture and heat and blend - i'll have to try this next time!

Sarah xx

PS. The house still reeks of onions! Luckily the taste of the caramelised onions more than makes up for it!

Wednesday 23 November 2011

Caramelised Onions

Caramelised onions make everything taste better. Unfortunately making them involves stinking your house out with the pong of onions but that's something i'll endure if it means a massive supply of caramelised onions in the fridge. Cooking caramelised onions usually involves a long cooking time with lots of stirring - that's where the Thermomix comes in handy. Unfortunately the cooking time wasn't decreased, but i didn't have to worry about standing and stirring the whole time.

Given that i already had the crumbed tofu from last night i decided to make a tofu parma. I blended some leftover ratatouille with tomato pasta sauce and topped the parma with caramelised onions and cheese. It was lip-smackingly good! I love it when leftovers taste better than the original!

Now onto the caramelised onion recipe....


Caramelised Onions
1.2kg brown onions, sliced
1/2 MC olive oil
75g butter
1/2 MC balsamic vinegar
100g brown sugar
salt to taste

Put the onions, olive oil and butter into Thermomix bowl. Cook for 50 minutes at 100 degrees on reverse and speed soft. Add in balsamic, salt and sugar and cook for 30 minutes at varoma on reverse and speed soft. ENJOY!

note: My onions had quite a bit of liquid which wouldn't evaporate so i strained it off before adding the vinegar and brown sugar. Next time i might experiment with cooking the onions on varoma temperature for the entire time although it may be at risk of burning.

Have you got any hints for the perfect caramelised onions?

Sarah xx

Crumbed Tofu with Ratatouille

Don't you hate it when you don't know what you feel like for dinner? Well this was one of those nights. My housemate suggested tofu but i didn't really feel like doing something Asian. In the end i had an idea to make tofu parmigiana. However i also felt like eating a ton of vegies so the tofu parma morphed into crumbed tofu with ratatouille.

Not the most photogenic of dishes, nor the greatest photo but i was hungry!
 The result was pretty pleasing. The tofu was delicious! I'll definitely make the tofu again. Incredibly flavoursome and crunchy yet there was no frying involved! The ratatouille was so-so - i've definitely made better and had better. It was just a bit boring.

Looks like Weetbix!
I'll type out how i did the tofu but i don't think there is much point typing out the ratatouille, i'd recommend choosing your favourite recipe and putting it on the tofu. Otherwise caponata would be a really nice addition - this is my favourite recipe OR you could make a parma like i'd originally intended.

Crumbed Tofu 
serves 4
3 slices bread (i just used the crusts of some multigrain bread)
1 1/2 cups roasted chickpeas
1 tsp oregano
1 tsp garlic powder
1 tbsp tomato powder
1/4 tsp salt
pepper
1 cup grated parmesan
3 eggs
1 tbsp vege stock concentrate
500g very firm tofu (dried with paper towel)

Preheat your oven to 180 degrees and line a tray with greaseproof paper.

Put the bread in the Thermomix bowl and pulse for 3-4 times or until breadcrumbs form. Add in the parmesan and ground pepper and stir on reverse and speed soft for 10 seconds or until incorporated. Tip onto a dinner plate and set aside.

Place the chickpeas into the Thermomix bowl and blend on speed 9 for 6 seconds or until powder. Add in garlic, oregano, tomato powder, salt and pepper. Stir on reverse and speed soft for 10 seconds or until incorporated. Tip onto a dinner plate and set aside.

Crack the eggs into a bowl and add the stock. Whisk lightly with a fork. (I suppose you could do this in the Thermomix but i didn't.) 

Place your tofu on a chopping board and cut into 3 horizontally. Cut each piece into 3 strips. 

For each piece of tofu place it in the chickpea mixture, ensuring it is well coated, then dunk into the egg then cover in the breadcrumb mixture. Place on the prepared tray and repeat, until all pieces are coated.

Spray the tofu with oil before putting in the oven and baking for approximately 1 hour, turning over halfway. 

Enjoy!

Note: i only used chickpeas because we had some in the pantry that weren't getting eaten. You could substitute any kind of flour.

Sarah xx


Monday 21 November 2011

The 60 Degree Egg


Looks like a normal egg doesn't it?

This isn't your run of the mill boiled egg. It is an egg cooked at 60 degrees for 60 minutes. Why bother? Why should you have to plan your breakfast an hour in advance? Well i have no real answer except to say i was intrigued. Supposedly by cooking an egg in this manner, some of the proteins denature, yet others still stay in their natural form which results in a cooked, but not tough/rubbery egg. Technically you are supposed to cook the egg at 62.7 degrees in order to only set some of the proteins in the egg but you can't set a Thermomix to such a precise temperature.

After 60 minutes
Upon peeling the egg it was obvious that it was different to the run of the mill boiled egg. The egg was jelly-like and the colour almost opaque.


The texture of this egg is unlike a poached egg nor a boiled egg. The yolk was cooked to the same degree throughout and had an almost custardy texture. The white was a soft as silk without a hint of bounce and without the raw gooby bits that you get in some undercooked poached eggs!

So was it worth an hour? If you are not hungry definitely!

Sarah xx

The very quick recipe
60 Degree Egg - Put eggs in the Thermomix basket, fill Thermomix bowl to 2L and pop the MC on to prevent evaporation.  Set time to 60 minutes, temperature to 60 degrees and speed to 3. Wait for an hour then enjoy!


Edit: If you don't like a really runny yolk you might prefer cooking the egg at 70 degrees for the last 5-10mins.

Sunday 20 November 2011

Cake Decorating

Apart from cooking one of my favourite hobbies is cake decorating. I only do it for fun and the cakes that i make are just for friends and family. I always get excited when a big birthday comes up because it gives me the chance to decorate! I've never done any courses and most of the cakes i just make up as i go. I'll get inspiration from flickr or google images and youtube has helped along the way but most of the time it's just pure luck how it turns out! Anyway i thought i'd post some pictures of the cakes i've done in the past just to keep a record. Most of them are by all means no perfect but hey, i'm not a pro! I've got another birthday coming up in a fortnight so i'm really looking forward to decorating again soon!

Sarah xx

 Sandy's 60th music themed cake (white and dark choc mud)

 Sam's 21st Dr Pepper cake (cherry choc mud cake)
 My 21st cake (white mud with raspberry ganache)
 Dr Pepper cupcakes
Dad's 50th Thunderbird 3 (buttercake)

 Sam's 21st Burger & Fries (white choc mud with brownie 'pattie' and sugar cookie fries)
 Anna's 21st Apple (white choc mud)
 Ginny's 21st Stars (flourless orange & almond and choc mud)
Mum's 50th Chocoholic (white & dark choc mud)

Smoky Eggplant Hummus

I'm always stuck with random vegies and leftover bits and pieces in the fridge. In winter these usually become soup but as the weather warms up they are more often becoming dip. So what happens when you find 3/4 eggplant and a cup of chickpeas in the fridge? You turn it into eggplant hummus of course!


Smoky Eggplant Hummus

1 small eggplant
1 clove garlic
1 tbsp olive oil
1 cup chickpeas (cooked or tinned)
1 tbsp tahini
2 tsp cumin
2 tsp pomegranate molasses
salt and pepper to taste
sumac to sprinkle on top

Cook your eggplant over a naked flame or in a barbecue until the skin is black and the inside is soft and squidgy. When cooled remove flesh from skin and set aside. Place garlic and olive oil into the Thermomix bowl and chop for 5 seconds on speed 7. Scrape it down off the sides then cook for 2 minutes at 100C. Add remaining ingredients and blend for 20 seconds on speed 5-6. Depending on how runny you like your dip you can add a bit of water to thin it out if desired. Scrape into a bowl and sprinkle with sumac. Enjoy!

Sarah xx

Saturday 19 November 2011

Taxi Dining Room @ Federation Square

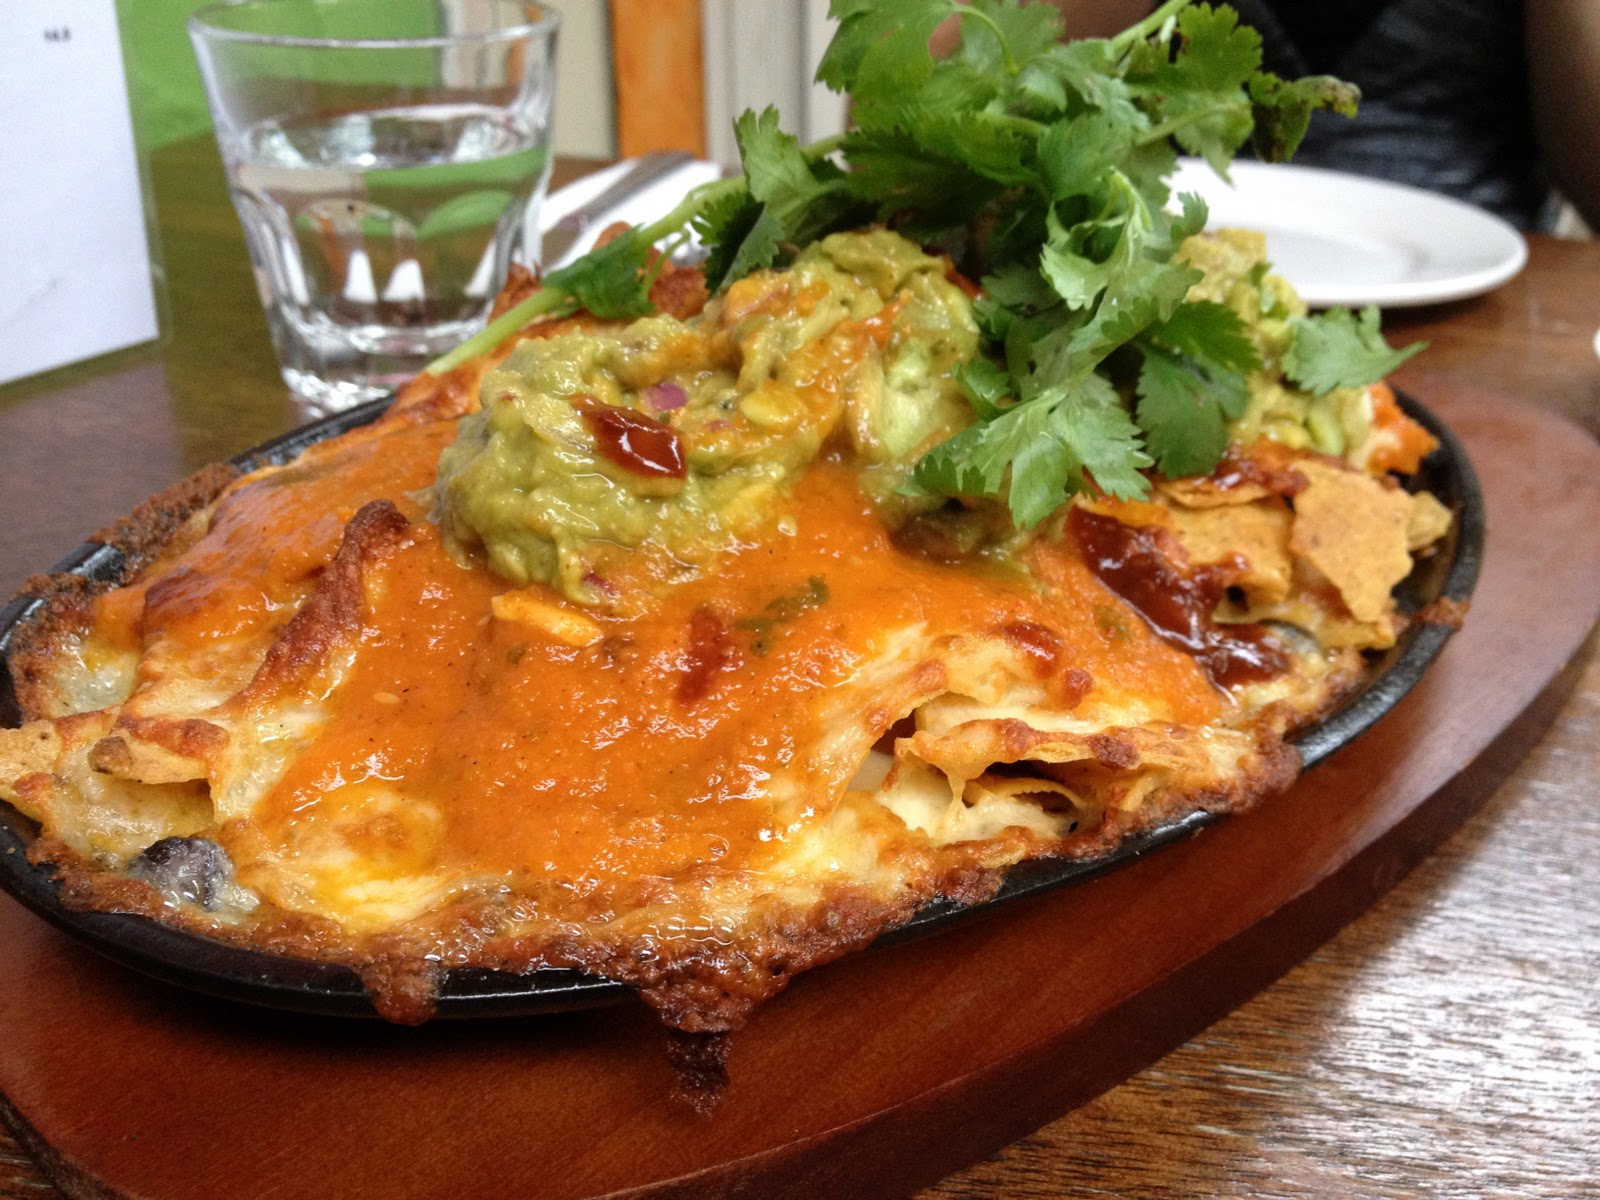
It's degustation time! I have wanted to have a degustation meal for years however no one seems to share my enthusiasm for such an affair... until last night! We opted for the 7 course degustation which was a good call - good luck eating everything on the 9 course menu! Overall i thought it was fabulous - the venue was great, the wait staff pleasant and helpful although we would have had at least 5 different staff during the evening and the food was delicious. Admittedly, i wasn't completely blown away by the food however my expectations were probably a tad unrealistic. The waiter coming around with a tray of sunglasses during sunset was a bit humorous - from the look of the full tray i don't think there were many takers! For modern asian cuisine in Melbourne i still prefer Gingerboy and for high class Japanese i'd head for KoKo @ Crown.

Just a bit of a disclaimer - although i tried my hardest to hear the waiter's description of the course, i may have gotten some of the elements confused with the omni version as the waiter had to explain both to the table.

Course 1: Apple and mushroom salad with ponzu dressing.

 A deliciously fresh and tangy salad with a moorish tangy dressing. I wish i hadn't scoffed the bread earlier so i had something to mop up the last skerrick of dressing.
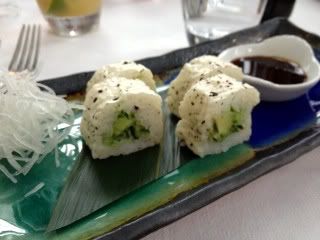
Course 2: Avocado and cucumber roll.
 Not wrapped in nori - no idea what the white wrapper was although it didn't have a strong taste. This course was so-so - not all that different from something you'd get at your local takeaway sushi store.

Course 3: Gingered carrot soup with coriander shoots. 
Very creamy soup. To be honest it was probably my least favourite course - a tad boring. The omnis' soup looked fabulous! It was a broth with a fried wonton. Not sure why they couldn't have vegetarianised it :(

Course 4: Tempura.
Zucchini flowers, tofu, eggplant, asparagus, enoki and king oyster mushrooms. This course was fabulous! Deliciously thin and crispy tempura batter, not in the slightest bit oily with a delicious sweet chilli tomato dipping sauce.

Course 5: Vegetarian tasting plate
Check out the oozy filling!
 Chinese turnip cake with black bean and seaweed pickle (bottom right), pumpkin and tofu with a sesame crust on a coriander puree (top right) and stuffed zucchini flower with buffalo mozzarella (left). The final savoury course. I thoroughly enjoyed it as it was different to anything i'd ever tasted (except the zucchini flower.) The turnip cake was made from finely grated vegies, cut into a cube and fried. The pickle was a fantastic salty condiment. The tofu pumpkin was deceiving. On the outside it looked like a firm cube of sesame crusted fried tofu, but cut into it and it was soft and oozing. A very subtle flavour which complemented the strong sesame coating and coriander salsa. The zucchini flower was delicious but i thought it a tad repetitive as the previous course featured a zucchini flower - perhaps another protein-based dish would have been more appropriate.

Course 6: Frangelico jelly, crusted hazelnut parfait, milk chocolate ganache.
What can i say - it's a chocolate based dessert... how can it not be delicious?
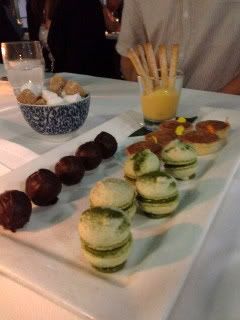
Course 7: Petit fours and coffee
Green tea macarons, Kahlua cups, mandarin truffles, lemon curd. Although i make macarons all the time i have never made, nor eaten, green tea macarons. I dislike green tea to say the least and unfortunately i didn't really like these macarons. The Kahlua cups were deceptively runny but they were delicious and given Kahlua is my favourite liqueur,  they weren't going to disappoint! The mandarin truffles were smooth and creamy as was the curd. I love lemon curd and this tasted just like my grandma used to make. Give me biscuit sticks and lemon curd any day!

Overall it was a fabulous experience. The degustation way of dining is definitely my style. Bring on the next one!

Sarah xx

Homage to My Brother - Tempeh 'Non Carne'

It's widely known in my family that my brother's famous dish is his chilli con carne. It was in fact his only dish for several years! So when i stumbled across a recipe for Tempeh Chilli Con Carne in the Thermomix Vegetarian cookbook i knew it had to be made asap. I actually didn't end up following the recipe as i wanted to make a version that would remind me of my brother's as i haven't eaten his dish for many years since becoming vegetarian. In addition to the chilli, i also made a quick guacamole (1 avocado, juice of 1 lime and 5 sprigs coriander blitzed up) and cooked my rice in the Thermomix.

It took all of 20 minutes to cook the chilli then another 12 for the rice and 1 for the guacamole. I'd say that's a quick meal given that you don't need to actually stand and cook the whole time - you can write blog posts in the meantime!

Thank for the inspiration Sam - i had a delicious dinner! Hope i didn't completely bastardise your version! I think some of the leftovers will be turned into jaffle fillings, on baked potato and in wraps. I love versatile recipes!

Sarah xx


Tempeh 'Non Carne' serves 4
1 onion, quartered
2 cloves garlic
1 long red chilli
200g tempeh, roughly chopped
15g oil
400g tin diced tomatoes
2 tbsp tomato paste
2 tsp cumin
1 tsp coriander
1/4 tsp cayenne pepper (or to taste)
1/2 tbsp vegie stock concentrate
400g tin kidney beans.

Place onion, garlic and chilli into Thermomix bowl and chop for 3 seconds on speed 6.
Add tempeh and oil into bowl and pulse twice then saute for 4 minutes at 100C on reverse & speed soft.
Add all other ingredients except kidney beans and cook for 8 minutes at 100C on reverse & speed soft.
Add kidney beans and cook for 1 minute at 100C on reverse & speed soft.

Serve with guacamole and steamed rice.


Friday 18 November 2011

Breakfast Time!

Breakfast is my favourite meal of the day. I love going to cafes that serve all day breakfasts because it means i can have breakfast for lunch - win! I thought i'd test out a quick and easy Thermomix recipe that is in the Vegetarian TMX cookbook but also appears on several blogs and forums.

Introducing CADA
What is it?
Coconut
Almonds
Dates
Apple

It was so simple to make - i just put 1 large granny smith apple (chopped into big chunks), 3 dates, 2tbsp coconut and 12 almonds into the Thermomix. Pulsed it 3 times and voila! CADA!

It really is delicious and a great start to the day. I mixed half of it with a small tub of yoghurt and a couple of tbsp muesli and chia and left it overnight. It kept me full for at least 5 hours which is a great when you're at work and don't have any decent snacks nearby. The best bit? I have the other half for breakfast tomorrow - can't wait!

Sarah xx

Thursday 17 November 2011

Thermie Fail

Well i had my first failure - yoghurt. To be honest i wasn't all that hopeful that it'd work as i had read many posts on the Thermomix forum regarding yoghurt disasters. I used low fat milk and Jalna 'Leben' yoghurt as my starter plus some skim milk powder. After following the recipe in the EDC cookbook the result this morning was runny, off milk. Delicious! A few things could have caused the failure 1. The thermos is a bit dodgy and 2. the yoghurt i used was low fat and was on its expiry date. I'm not going to give up on yoghurt just yet... might see if i can get an insulated bowl/Thermoserver and some decent yoghurt starter.

In other news i went to Sunnybrook healthfood shop and bought some  'Natural Desserts' vegan strawberry jelly. It is amazing! Tastes like the real stuff - not the weird bouncy agar version.

Not sure if the Thermomix is going to get a run this arvo - still got leftover risotto for tonight YUM!

Sarah xx

Wednesday 16 November 2011

Finally got my hands on it!

Greetings! Guess what got delivered yesterday? I'm so excited. I think i'm in love just a little. So far i do not regret parting with $1939 one bit! I just wish i had some more mouths to feed so i could cook more. So far i have made mango sorbet and watermelon & lime sorbet
It took all of 3 minutes to make sorbet. I used the recipe from the EDC. The only thing extra i did was after it had been in the freezer for about 4 hours i re-churned it just to make it super luscious. 

The next thing i made was the vegie stock concentrate. I didn't exactly follow the recipe identically - i used the random vegies i had in my fridge which included swede and fennel in addition to the vegies mentioned in the recipe. I didn't take a photo considering the outcome although great, looks a lot like baby poo. I can't believe how much the recipe makes and it's so cheap. Those stock companies must be making an absolute fortune...

Then because i had this fantastic stock i thought i'd test it out by making risotto. It was delicious! I followed the mushroom risotto recipe in the EDC however i didn't use mushrooms, instead i used asparagus, peas and homegrown snowpeas. I also halved the recipe as it was just me at home for dinner. Surprisingly it still took 16mins to cook. There are leftovers for tomorrow - gotta love gourmet lunches!
Like the broccoli flowers on top? I thought they were cute!

Finally i made some capsicum and sundried tomato dip. Again from the EDC. I promise once i get the hang of the thermomix i'll start posting my own recipes up on here.  The dip is fabulous and i highly recommend it. I can't believe all it took was 4 pulses to turn all the ingredients into one fabulous dip. 


Well that's the end of my first day of cooking using the thermomix. Hopefully tomorrow i'll be able to have a bit more of a play.

Sarah xx